Showing posts with label book making. Show all posts

Tuesday, September 8, 2009

Cardboard Book Making


I LOVE cardboard! It’s very hard for me to throw it into the recycle bin. This bunny book is an exact copy of a cardboard book I saw in Target for $6. I couldn’t believe the price of it! No kidding, the book was made the same way I made this one here- recycled.....READ MORE

Friday, June 5, 2009

Homemade Book of Tea-Stained Paper

The Little Ladies and I have been busy making homemade books lately. I don't see us ever buying a journal or blank book again. Book making is so much fun and we can make the books exactly how we want them. The first book we'd like to share is the ladies' field guides of magical creatures. We wanted a weathered look to these field guides so we used our tea-stained cardstock.


We punched three holes down the left side of the cardstock and added 1 inch book rings to keep the pages together.


We don't do any book making without our favorite art supplies: woodless color pencils, oil pastels and watercolors!


The watercolors do incredibly well on the tea-stained cardstock. The girls spend many afternoons under the oak tree painting in their field guides.


We made pages that open out, and stapled pockets into the books to hold feathers and other treasures.


We used a thick ribbon of ric-rac for a bookmark by tying it to the top ring.


The Little Ladies' books have legends and lore of plants that grow in our yard. We taped down the plants with wide packing tape.


The books also have notes and illustrations of sprite and fairy sightings. We see them quite often zipping in and out of the plants. "Is it a fairy or is it a bee, it is too quick to be sure what I see!"


This type of book is nice because you can move around the pages and add more if the need be. Enjoy!

Thursday, May 28, 2009

An Owl, a Sea Otter, A Bedtime Blessing and a Baby Shower

A dear friend of mine is due to have her first baby in July. We had a surprise baby shower for her yesterday. The little ladies and I gave her a basketful of homemade gifts.


The girls decorated an apron for her with leaf prints ( I actually forgot to photograph it...that's how crazy yesterday had been). I made the little babe this little lavender scented sea otter made out of an old cashmere sweater. Oh, he is soooooo soft! The little ladies have each put in orders for one.


I also made the baby an owl that makes a crinkly sound when squeezed.


More handmade gifts by my family.....here is the beautiful mama to be with an octopus quilt made by my sister Robin.


My sister Katrina made her some beautiful homemade books. One book full of parental wisdom (filled out by the shower guests) and one book to write dreams and wishes for the babe.


My mom got creative with her gift by making this baby out of burp cloths, onesies and a little cap. Then she placed the cloth babe in a Boppy sling. It was very hard for the mama to be to take this babe apart!


The little ladies had cupcake duty. They gathered violets, clovers and mint then gently placed each flower onto a cupcake. They were so proud of the finished product (and themselves).


Here is my sister Katrina and my mom with the little ladies.


Robin (another sister) didn't make it into the picture, she was busy writing wishes to the new babe. She wrote down the little saying I say to my girls each night while tucking them into bed:

A star for you to wish on (say this while you draw the star with your finger on the child's forehead),
The sun for warmth and light (draw the sun),
The moon for you to think on (draw the moon),
Pleasant dreams,
And a hug and kiss goodnight
(give a hug and kiss).

Homemade book made by Katrina

This little lady LOVES her chocolate! I think this was her favorite moment of the shower. She also guzzled down the lavender lemonade.

This one LOVES her fruit! The poor little thing was so confused about what exactly a baby shower was. She was a little afraid that the baby might be born at the shower and we would all bathe it. She's pretty sure she's not ready for that kind of womanhood!

We were so happy to celebrate the new babe with our lovely Shawna. We wish her many blessings and happiness with the new joy on the way!

Saturday, May 23, 2009

Make a Portable Flower Press for Your Herbarium

Here's the perfect little flower press to carry with you whenever you go for a hike or even a walk around your own backyard. We keep one in the car too because we always come across plants which we find pretty, want to remember a special event, or can't identify so we can bring them home and look them up.


To make one you need:
newspaper
corrugated cardboard from an old box
rubberbands (at least 3 thick rubberbands)
scissors
flowers
leaves
package tape or clear contact paper


STEPS:

1. Cut the cardboard into 3 rectangles that are 8"L x 5 1/2"W.


2. Cut the newspaper into 8" x 5 1/2" rectangles. These are your pressing papers.


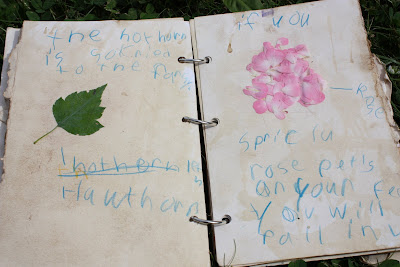
3. Decorate the cover with stamps, flowers, and/or leaves. I used clear contact paper and packing tape to press the leaves and flowers onto the cover.


4. Gather your favorite flowers and leaves to press.


5. Place the bottom cardboard cover down first, layer a couple sheets of newspaper on top of the cardboard and place your flowers face down while smoothing them out as much as possilble. We usually write the location, date and name of the plants we are pressing onto the newspaper to keep a record of them.


6. Layer a few more sheets of newspaper on top of the first layer of flowers, then place more flowers or leaves face down onto the press.

7. Put on the middle piece of cardboard after you have about 5 layers of plants; continue to layer until you run out of flowers. Put the cardboard cover on top and put the rubberbands around the press. You can make the press as thick or thin as you want, just add more newspaper and cardboard as you go.


After a week or two, the flowers should be pressed and ready to remove. Please don't forget the nature rule....."if there's more than 10 you may collect a few, less then 10 don't be a greedy fool!" We NEVER pick any of our endangered plants and wildflowers. Enjoy!

Monday, May 18, 2009

Tea Stained Paper

We have been experimenting with book making lately. Books are a big deal in my house and the girls love making them. The thing I love the most about book making is that the girls are so excited to write in them.


We were tired of the stale white paper we were using so we decided to "age" the paper.


For tea staining you need:

* 81/2" x 11" cardstock (we used cardstock because the girls wanted a thicker paper, you can do this activity with any kind of paper)
* 3 black tea bags
* water
* clothespins
* yarn
* a pan

To set up the activity:

1. Boil the water.
2. Add black tea bags and let steep for about 5-10 minutes.
3. Put up a line for the paper to dry.
4. Fold cardstock in half, this will make the tearing step easier.


We did the smearing and blotting method. We simply took the tea bags and smeared and blotted them directly onto the cardstock. Fauna LOVED this, anytime she can get messy for art, she is right there! She loved to smear!


Araina loved to blot!


Once the cardstock was good and wet we carefully tore the cardstock in half because we wanted a worn edge look. Then we clipped them on a line to dry.


When we were done staining the stack of paper we tried a drizzle effect on the paper by squeezing the tea bags over the paper hanging on the line. This left cool lines and patterns on the paper. We left specks of tea on the pages as well.


The Little Ladies had tea-covered hands in the end.


Once the papers were dry we took them off the line, stacked them and placed a concrete block on top of them to press them flat.


The hotter the water, the deeper and darker the color on the white cardstock. If you are not satisfied with the color after the first staining, do another tea stain to the cardstock. Coffee is a good stain for really dark pages. Keep experimenting until you get your pages just right.

*I will be posting more about what we are doing with these pages in future posts.