Showing posts with label tutorial. Show all posts

Thursday, December 3, 2009

cinnamon-applesauce ornaments


A yearly holiday tradition for us is making cinnamon-applesauce ornaments. I started making them 12 years ago when I was looking for a “holiday scent” activity to do with my kindergartners. I believe I’ve been making them every year since! The little ladies and I deck our Yule tree with them; they smell so wonderful! They keep their scent for a long time.......CLICK HERE FOR RECIPE.

Thursday, October 8, 2009

spit stitch


Learn to sew a split stitch. READ MORE

Sunday, October 4, 2009

handmade holidays- (MY SISTERS- DON'T DARE PEEK)


The handmade holiday making has begun! It started with an inspiring post on how to make a no sew shawl from........READ MORE.

Thursday, August 6, 2009

Homemade Clipboard


This is pretty self-explanatory, but in case you are a person that likes directions........

What you need:
9 1/2" by 13" piece of cardboard (from a box), 2 clips

I cut the cardboard to size and use the clips to hold the paper onto the board. There is room under the clip to hold a pencil. The park district I used to work for used pizza boxes; they would also tape a piece of yarn to the board to tie on a pencil. The yarn really helped keep the little ones from losing their pencils.

Tuesday, August 4, 2009

Waxing Flowers for Preservation

In the 1840's, paraffin began to be produced in quantity as a by-product of the petroleum industry, and ladies soon discovered that they could preserve fresh flowers and leaves by coating them with this inexpensive substance (hmmm, the beginnings of the petroleum addiction?). Bridal bouquets and funeral wreaths, wax-dipped and glass-covered, were favorite parlor decorations of the "Age of Sentiment," cherished for the memories they evoked. (Info from Making Gifts from Oddments and Outdoor Materials by Betsey B. Creekmore)


In the tradition of the Victorian waxed flower bouquets the Little Ladies and I had to try this method of preservation out! We picked all different types of flowers and leaves to see which would work best. The feverfew, daisy and echinacea did not work very well at all; you need more thick fleshy type petals that can withstand the hot wax.

*Pick a cool rainy summer day for this activity; it will warm up the kitchen quickly!

What you need: soy wax, beeswax or paraffin, (I used soy) fleshy petal flowers (zinnia, tulips, lily, orchid, rose), clothespins, double boiler to melt wax, wax paper, narrow-necked glass bottles, candy thermometer (optional)

Steps: Melt the wax until it shows a temperature of about 130 degrees on a candy thermometer (or just wait until all of the wax melts). Remove the pan from the heat. Hold the flower by its stem and dip it into the wax, I used clothespins to prevent my fingers from getting burned. Dip the flower into the wax, deep enough to cover its entire head.


Then lift the flower immediately and shake it over the pan to remove excess droplets. Separate and straighten the petals to your liking before the wax dries.


Stand the flower upright in a narrow-neck bottle until the wax has hardened. Don't let the flowers touch each other or they will stick together. Let them dry and re-dip if you wish. You will notice that the wax catches in the nooks and crannies of the petals and will leave a thick waxy area. Blot these places carefully to rid of the excess wax.


The lily and orchids kept their colors really well after waxing. The wax just seemed to soften them a bit. Here they are before:


And after:


Zinnias lose their color when waxed but they created a really pretty wood appearance. Here they are before the waxing:


And after:


Don't just try flowers, try deciduous leaves. We also tried acorns, pinecones and grass heads full of seeds. It was really fun. Now to go make a garland of waxed leaves to hang across our bow window.


Enjoy!

Wednesday, July 15, 2009

Making Pet Rocks

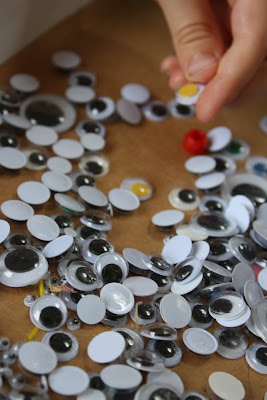
Children of the 70's should remember these being the fad! I had a pet rock, my sister had a pet rock and all of my friends had pet rocks. I taught my pet rock to sit and stay, fed her oats and she lived in a special little box. I took her EVERYWHERE! I told the Little Ladies about the pet rocks from my childhood and they couldn't resist making some (many).

What you need:
rocks- polished or clean ones from the yard
googly eyes- you can use "Adhesive Wiggle-Eyes" or ones without adhesive
Tacky glue or glue dots
a tin or small box for a bed


Araina made her pets from polished rocks. You must use glue dots or Tacky glue on the polished rocks in order for the goggly eyes to stick well; "Adhesive Wiggle-Eyes" don't adhere well to the polish.


Fauna gathered rocks from the yard to be her pets, she preferred their organic look. She put on adhesive googly eyes which stick well on clean non-polished rocks. This pet rock lives in a pot with a little oak sapling.


If you make a pet rock, you must make it a bed. Araina used lamb's ear in a chocolate tin for her pets' soft bed.


History of the Pet Rock from Wikipedia:
Pet Rocks were invented by advertising executive Gary Dahl. The first Pet Rocks were ordinary gray stones bought at a builder's supply store and marketed as if they were live pets.
In 1975, Dahl established Rock Bottom Productions, a company that sold the rocks for $3.95 each. The stones were nestled in a small cardboard box, similar to a pet carrier, and came with a "Pet Rock Training Manual." The manual had instructions on how to properly raise and care for one's new pet and suggested several commands that could be taught to the new pet. While "sit" and "stay" were effortless to accomplish, "roll over" usually required extra help from the trainer. "Come" was found to be impossible to teach, but "attack" was fairly easy. The trainers also found that potty-training their pets was rather hard.

View Magic Onion's take on Pet Rocks.

Araina's pet rocks seem to be on the lazy side and hitch a ride on her tricycle often! By the way, Araina has requested a pet rock felty!

Sunday, July 5, 2009

Sewing on Leaves

The weirdest thing, I went outside to water our shade garden this morning and low and behold I couldn't believe my eyes! Did the fairies do some stitching in the moonlight?


Ok, so you know it wasn't the fairies. The Little Ladies and myself had something to do with this. I was inspired by resurrection fern's embroidered leaf post for this sewing activity. I knew the girls would love this so we picked some hosta leaves (or any thick skinned leaf), grabbed some pretty craft floss and the sewing needles.


The plan was to press the stitched leaves when we were done, in hopes of preserving our creations. I had pressed a hosta leaf about a month ago, so we were able to see the color our leaves would turn after being pressed. We had this in mind when selecting the colors of floss to stitch with.


Araina stitched inch worms of various colors on her leaf. I was so surprised with how gentle her sewing was, I put more holes in my leaf than she did!


Fauna free-handed our dog, Denali, onto her leaf. She poked holes in the leaf for Denali's eyes. She stitched in silence until she was done. Such concentration!


I love it that she stitched this without drawing it first. She is such a free spirit; my motherly influence over her must never inhibit that! Here is her finished product.


Araina told me that she used the hosta's natural veins to guide her stitches. Here is her finished product; that's a lot of inchworms inching on her leaf!


I made french knot polka-dots on my hosta leaf. The french knots were a tad challenging to do on the leaf's delicate surface. Here's my finished product.


We will press the leaves for about a month, then possibly frame them if they press well. We had to pull out the big press for this pressing!


This was really fun for us all! It's another way to get kids sewing and appreciate nature at the same time! We will be trying another leaf sewing activity later in the week. Enjoy!

Wednesday, July 1, 2009

Queen Anne's Lace Fireworks!

Don't these colored Queen Anne's Lace flowers look like fireworks? They would make a beautiful July 4th decoration and you'll have a chance to teach the kids some botony on the side. ;) I saw Joy, You know how we're an art family, do it with her family, and me being the nature girl I am HAD to try it. I've done this with carnations and celery, but this is by far my favorite flower for this experiment!


What you need:
Freshly cut Queen Anne's Lace flowers
Food coloring (we used Easter egg dye)
Clear bottles
Water


Now, simply color the water (10-20 drops) and add a flower to each bottle. Then wait, keep checking the flowers every 10 minutes. Let them sit overnight too, they get brighter and bolder with time.


Make predictions about which one will be colored first. Orange was the fastest for us, then blue, yellow and green.The red and purple barely worked at all, the backs of the florets turned color, but you couldn't see it through the front.


How does it work?
Most plants "drink" water from the ground through their roots. The water travels up the stem of the plant into the leaves and flowers where it makes food. When a flower is cut, it no longer has it's roots, but the stem of the flower still "drinks" up the water and provides it to the leaves and flowers.
There are two things that combine to move water through plants -- TRANSPIRATION and COHESION. Water evaporating from the leaves, buds and petals (TRANSPIRATION) pulls water up the stem of the plant. This works in the same way as sucking on a straw. Water that evaporates from the leaves "pulls" other water behind it up to fill the space left by the evaporating water, but instead of your mouth providing the suction it is due to evaporating water. This can happen because water is very sticky--to itself (called water COHESION) and because the tubes in the plant stem are very small (in a part of the plant called the XYLEM). This process is called CAPILLARY ACTION. (Explantation from Steve Spangler Science).


We also tried this with Daisy Fleabane, the orange worked, but the rest of the flowers didn't change colors. Our next experiment will be to try and figure out why purple and red didn't work on the Queen Anne's Lace and why only the orange worked on the Daisy Fleabane.


Now I am off to press these beauties for a future activity! Enjoy!

Friday, June 26, 2009

Make a Lavender Wand

Lavender has been used for centuries for fragrance, to freshen linens and to keep the moths away. Elizabethan ladies used to gather lavender and transform it into these delightful wands or bottles to put in their linen cupboards. The ribbon traps the lavender blossoms and keeps them snuggly inside the wand so they don't scatter all over the clothing.

Book- The Pleasure of Herbs by Phyllis Shaudys

To make the wands you need:
9-15 (must be an odd number) straight stems of fresh lavender about 12 inches long (as long as you can cut them)
About 2-4 yards of 1/4" wide ribbon
Rubber band or string

Steps:
1. Strip the leaves off the stems and tie string or a rubber band at the base of the buds in the bundle.


2. Hold the lavender in your left hand with the buds facing down; gently bend the stems down one by one all the way around to encase the buds.


This is how your lavender should look after pulling the stems down.


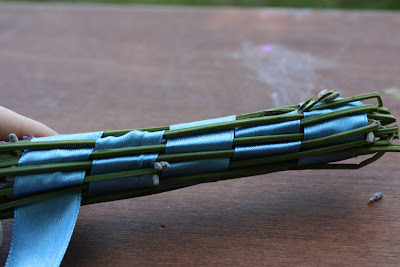
3. Starting at the bent end, take the ribbon, tuck it under a stem and secure it with your left thumb; begin to weave over and under the stems 1 or 2 at a time. Pull the ribbon tightly as you go along.


4. Continue to weave until the buds are tightly encased inside the ribbon. I continued to weave past the buds; it's really up to you when you want to stop weaving after the buds are completely encased.


5. Wrap the ribbon tightly around the bottom to make a pretty finish. Tie a knot at the end to secure.


The Little Ladies use the lavender wands as fairy wands and....


SWORDS! Violence by lavender; even little girls have thier rowdy moments! (Sounds like a A China Bayles Mystery)!

Besides fairy wands and swords, you can put them in your closet, in your dresser, or you could place one in a gift box for someone that you are giving clothing to. Enjoy!