Showing posts with label craft. Show all posts

Saturday, January 1, 2011

pinecone owls


Craft challenge for the little ladies......READ MORE.

Monday, November 2, 2009

wool kitty toys (handmade holidays)


Anyone who has ever owned a cat knows that they love to chase pom poms and little balls! The little ladies and I have been trying for some time now to make little balls out of wool roving, we are fairly new to this beautiful art form........READ MORE.

Friday, October 23, 2009

leaf mask


A fun Autumn tradition for us is making masks of pressed leaves.....READ MORE.

Thursday, September 3, 2009

Singing Cicadas


Yesterday we observed our annual cicadas and got a little crafty by making our own singing cicadas. Cicadas come in many different colors....READ MORE.

Friday, June 12, 2009

Pipe Cleaner Fairies


If you have fairy loving children, I'm sure you already know how to do this. We have been making pipe cleaner fairies for years now; but just in case you haven't, I thought I'd show you a very easy method of pipe cleaner fairy making which uses only 1 pipe cleaner. We used our rose petal beads to make the heads and flowers from our garden to make the hair.


What You Need:
Rose petal beads (any beads will do)
Pipe cleaners (one pipe cleaner per doll)
Silk flower petals (take apart a silk flower)
Flowers and leaves for accents
Yarn or cotton floss (optional for hair)


Steps:
1. Bend the pipe cleaner in half, pull the bead to the middle. If you want hair, place yarn between the bead and the pipe cleaner loop at the top of the head.


2. Twist the pipe cleaner to form a neck and hold the bead into place.


3. Pull up one side, form a loop at the side to make one arm, twist at the joint (the armpit).


4. Pull up the other side to form the second arm. Twist again at the armpit. Cross the legs to form an X and twist at the tummy to secure the arms.


5. Bring the legs together and poke them through the center of a silk flower.


6. Make loops at the end of the legs to form feet, add a flower to the top of the head for a hat or hair.


The Little Ladies added Lamb's Ear leaves to make wings for their fairies. They made rose, lavender, Lady's Mantle, thyme and lily fairies by placing the stems of the flowers into the hole at the top of the bead. Anything could be used for wings or hair, let you child's imagination sore!

Enjoy!

Tuesday, June 9, 2009

Rose Petal Beads

Beads made out of rose petals have been around for centuries; they have been used in meditation, in rosaries, and in jewlery. I have always found them fascinating and am in love with the idea of a bead simply made out of roses.


What you need:
3-8 cups of dark and fragrant rose petals (garden variety or florist shop); we used pink and yellow since that's what we had available
Water
Pan (cast iron pans are great because they create a really dark bead)
Mortar and pestle or blender
Chopstick, knitting needle or pin


Method:Put the rose petals in a pan and cover them with water; simmer for an hour. Do not let the water boil, this will kill the fragrance. After 1 hour take the petals off the heat and let cool. After the petals completely cool, simmer again for another hour. This is what our petals looked like after 2 simmerings. The petal pulp should be soft enough to create a paste.


Use a mortar and pestle, or a blender, to break down the petal fibers into a paste.
Strain out enough water until you are able to form a ball out of the paste.


Take a large piece of dough and make it into a ball, the beads will shrink about 30% when finished drying, so keep this in mind. Use a pin or chopstick to poke a hole through the beads, depending on how you plan to use your beads when dry.


Methods of Drying
1. Air Dry: place the beads on pins and air dry for a few days, be sure they have plenty of air circulation or they will mold.
2. Food Dehydrator: I would guess that this method would take 3-6 hours.
3. Oven Dry (this is how we dried ours): turn the oven to 150 degrees and cook for an hour, turning them every 20 minutes. They weren't completely dry after an hour so we let them air dry overnight.

Wow, the beads really darkened during the drying process and they are as hard as rocks! Our pink and yellow petals didn't make the most attractive beads, but they smell good and a lot of science was involved in making them.


I think we will try this again but with different flower petals, perhaps peonies; green leaves won't work because chylorphyll is too slimy. Staphanie and her cutie-pie kids at Ordinary Life Magic, are in the process of making rose petal beads also; be sure to keep visiting them to see their method.


A Little Rose Lore
While researching roses we found these great tales from The E-CBD Flower Store-

Greek mythology tells us that it was Aphrodite who gave the rose its name, but it was the goddess of flowers, Chloris, who created it. One day while Chloris was cleaning in the forest she found the lifeless body of a beautiful nymph. To right this wrong Chloris enlisted the help of Aphrodite, the goddess of love, who gave her beauty; then called upon Dionysus, the god of wine, who added nectar to give her a sweet scent. When it was their turn the three Graces gave Chloris charm, brightness and joy. Then Zephyr, the West Wind, blew away the clouds so that Apollo, the sun god, could shine and make the flower bloom. And so the Rose was...

In another story, an ancient Hindu legend, Brahma (the creator of the world) and Vishnu (the protector of the world) argued over whether the lotus was more beautiful than the rose. Vishnu backed the rose, while Brahma supported the lotus. But Brahma had never seen a rose before and when he did he immediately recanted. As a reward Brahma created a bride for Vishnu and called her Lakshmi — she was created from 108 large and 1008 small rose petals

So what did we do with the beads when they were dry? Nope, we didn't string them and make them into jewlery, we made our own little Lakshmi and a band of flower fairies. I will have a post about these cuties later in the week.

What's in a name? That which we call a rose; By any other name would smell as sweet. — William Shakespeare, Romeo and Juliet, Act 2 scene 2

Monday, June 8, 2009

Mud Critter Sculptuers

What do you get when you take mud,

Leaves, twigs or any other treasures found in nature,


And two little ladies that love mud????

Yes, she is kissing the mud!


Mud Critters!
Mr. Rocky

Hairy


Mr. FeFe


Flappy


Check out more mud lovers at Freeflowing Ways. They made some super cool clay homes for solitary insects and they are always playing in the mud over there.

Friday, June 5, 2009

Homemade Book of Tea-Stained Paper

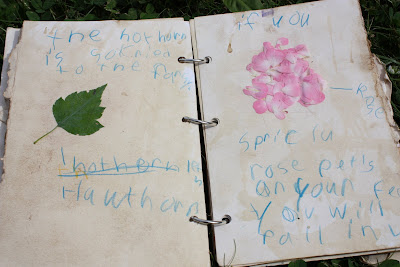
The Little Ladies and I have been busy making homemade books lately. I don't see us ever buying a journal or blank book again. Book making is so much fun and we can make the books exactly how we want them. The first book we'd like to share is the ladies' field guides of magical creatures. We wanted a weathered look to these field guides so we used our tea-stained cardstock.


We punched three holes down the left side of the cardstock and added 1 inch book rings to keep the pages together.


We don't do any book making without our favorite art supplies: woodless color pencils, oil pastels and watercolors!


The watercolors do incredibly well on the tea-stained cardstock. The girls spend many afternoons under the oak tree painting in their field guides.


We made pages that open out, and stapled pockets into the books to hold feathers and other treasures.


We used a thick ribbon of ric-rac for a bookmark by tying it to the top ring.


The Little Ladies' books have legends and lore of plants that grow in our yard. We taped down the plants with wide packing tape.


The books also have notes and illustrations of sprite and fairy sightings. We see them quite often zipping in and out of the plants. "Is it a fairy or is it a bee, it is too quick to be sure what I see!"


This type of book is nice because you can move around the pages and add more if the need be. Enjoy!

Wednesday, June 3, 2009

Egg Carton Birds

These egg carton birds were inspired by the lovely Andrea (and her lovely daughter) at cider and faun. Not only can Andrea draw and paint, but the nature inspired activities she does with her daughter are unique and fun.

I gave the girls cardboard egg cartons and paint and let them go wherever their imaginations took them.


Fauna used acrylics to paint her birds and a permanent marker for the details on the owls.


And here is her King of the Chicks.


Araina made a whole flock of different types of birds; she made a robin, red-winged blackbird, bluebird, finch, cardinal and a crow. She preferred to paint with watercolors.


After the paint dried they spent the entire day playing with their new little bird friends.

Tuesday, June 2, 2009

Mushroom Spore Printing

This spring we have been studying mushrooms (mycology). Our favorite activity with mushrooms is making spore prints. I can't believe how easy it is to do.


Warning! You obviously want to watch your little ones around mushrooms! Many different kinds of mushrooms are poisonous and can make you very sick. When handling mushrooms please be sure to wash your hands when you are through.


Pick your mushroom and remove the stem so your cap will lay flat. Place the cap on your paper of choice. The mushrooms we found leave dark brown spores so we used a creamy colored paper. Some mushrooms leave white spores, so the color of paper you use is important.


Place a glass cup or bowl over the caps.


Let the caps sit under the glass for about an hour. Tick Tock, Tick Tock.......this part is very hard for Araina!


After an hour, lift the glass and the cap, you should have a spore print. You can make more with the same cap while it is still fresh.


Be careful, the spores will smear! We learned this the hard way. A touch of hairspray or spray adhesive should preserve the prints.

Finding where the spores are located on the mushrooms is half the fun. Morels, for example carry their spores on the outside; slice in half and place the cap on its side to make a print.


Don't bother using those cute button mushrooms from the market; they just are not fresh enough to leave the spore prints.


We felt these beauties were frameable!